

If you find yourself repeatedly performing the same tasks in Excel, there’s an easy way to save time and reduce effort. Excel’s “Macros” feature offers a powerful solution by allowing you to automate these repetitive actions with just a few clicks. Instead of manually executing the same steps over and over, you can set up Macros to handle these tasks automatically, which can significantly enhance your productivity.Macros work by recording a series of actions you perform in Excel and then replaying them whenever needed.
This means you can automate tasks such as formatting data, generating reports, or even complex multi-step processes without having to repeat each step manually. Setting up Macros is relatively simple and can be done without any advanced programming knowledge. Once a Macro is recorded, you can run it anytime with just a click, making your workflow much more efficient.To get started, you first need to enable the Macros feature in Excel. After that, you can record a Macro by performing the actions you want to automate. Excel will capture these actions and save them as a Macro. You can then assign this Macro to a button or a shortcut key for easy access.
This guide will walk you through each step of the process, from enabling Macros to recording and running them. By following these instructions, you’ll be able to streamline your work, reduce the time spent on repetitive tasks, and focus on more important aspects of your job. Embracing Macros can greatly improve your efficiency and productivity, transforming the way you work with Excel.
What Exactly Is a Macro?
Macros are like shortcuts in Excel that can save you a lot of time by automating repetitive tasks. Think of them as a set of instructions that you create once and then let Excel carry out for you whenever you need. Whether it’s something simple like formatting data or more complex like generating reports, Macros can handle it all.
Creating a Macro involves recording the steps you take, giving it a name, and then saving it. These steps are saved in a language called Visual Basic for Applications (VBA), which runs in the background to perform your tasks. Once you’ve set up a Macro, you can play it back as often as you like with just a click of a button. This is especially useful for tasks you do regularly, as it means you don’t have to go through the same motions over and over again.
The beauty of Macros is in how much time and effort they save. Instead of manually doing the same thing day after day, you can automate it all with Macros, allowing you to focus on more important aspects of your work.
How to Enable Macros in Excel for a Single Session?
Macros can be activated for just one session or for multiple sessions, depending on your needs. If you’re wondering how to enable macros in Excel specifically for a single session, we’ll walk you through the steps. This approach allows you to automate tasks within that session only, providing flexibility without making permanent changes to your Excel settings. Let’s get started with enabling macros for an individual session.
Accessing your Excel file
• Find Your Excel File: Go to the folder where your Excel file is saved.
• Open the File: Click on the file to open it, which will allow macros to run if they are enabled.
• Watch for the Notification: After the file opens, you’ll see a dialogue box. This message will let you know that macros are currently disabled, indicating that they were turned off before the file was last closed.
Find and click on the ‘Info’ tab
• Locate the ‘File’ Menu: Click on the ‘File’ tab in the top-left corner of Excel.
• Navigate to ‘Info’: In the menu that appears, find and select the ‘Info’ option from the vertical list on the left.
• Select the Option: Click on the ‘Select’ button or link within the ‘Info’ section.
Activate macro content
• Go to the ‘Security Warning’ Section: Look for the ‘Security Warning’ area in your Excel window.
• Enable Content: Click on ‘Enable Content’ to open a drop-down menu.
• Access Advanced Options: From the drop-down menu, select ‘Advanced Options.’
• Choose Session Enablement: Pick the option ‘Enable content for this session.’
• Confirm Your Choice: Click ‘OK’ to approve and activate macros for the current session.
Verify Your Next Session
• Macros Activated for This Session: Macros are now enabled for the current session only.
• Reopening the File: When you close and reopen the file, you’ll see the same warning dialogue box again.
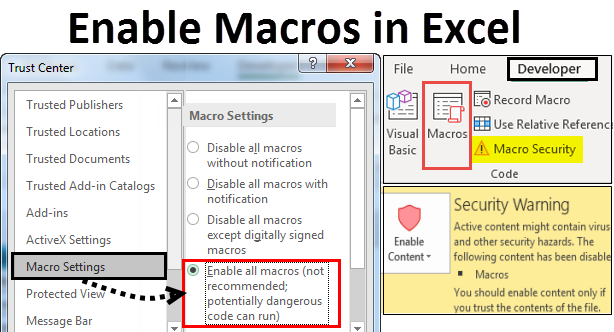
How to Set Macros to Always Be Enabled in Excel?
To address the question of ‘how to enable macros,’ first make sure you have permission to add macros. If this option isn’t available, contact your system administrator to gain access. Once you have the necessary permissions, follow these steps to enable macros permanently in Excel.
Open the Excel Document
1. Open the File: Double-click the file that includes macros.
2. Check for Message: Look for a message that says ‘Macros have been disabled’ when the file opens, indicating that macros were turned off in the previous session.
Access the Trust Center
• Click on ‘File’
• Select ‘Options’
• Locate the ‘Trust Center’ on the navigation panel
Find Macro Settings
• Open ‘Trust Center Settings’
• Click ‘Macro Settings’ Activate the Feature
• Click on ‘Enable All Macros’
• Choose ‘OK’ Disable Macros
Disable macros
Choose among the four options for disabling macros:
• Disable all macros without notification
• Disable all macros with a notification
• Disable all macros except digitally signed macros
• Enable all macros
Use a Shortcut to Enable Macros
Instead of going through all the steps, you can quickly enable macros using the warning message. When the dialogue box with the warning appears, simply click on the ‘Enable Content’ option to enable macros permanently.